Free Printable Checklist
Download the print-ready PDF version of this checklist with a log to record annual test results.
Annual Checklist: 12 Tasks
1. Schedule Your Annual Water Quality Test
Test at minimum for total coliform bacteria, nitrates, and pH every year. The best time to test is spring, after seasonal rainfall and snowmelt that can introduce surface water into the well. Use a state-certified lab—results from uncertified DIY kits don't give you a legally acceptable record. Find a certified lab →
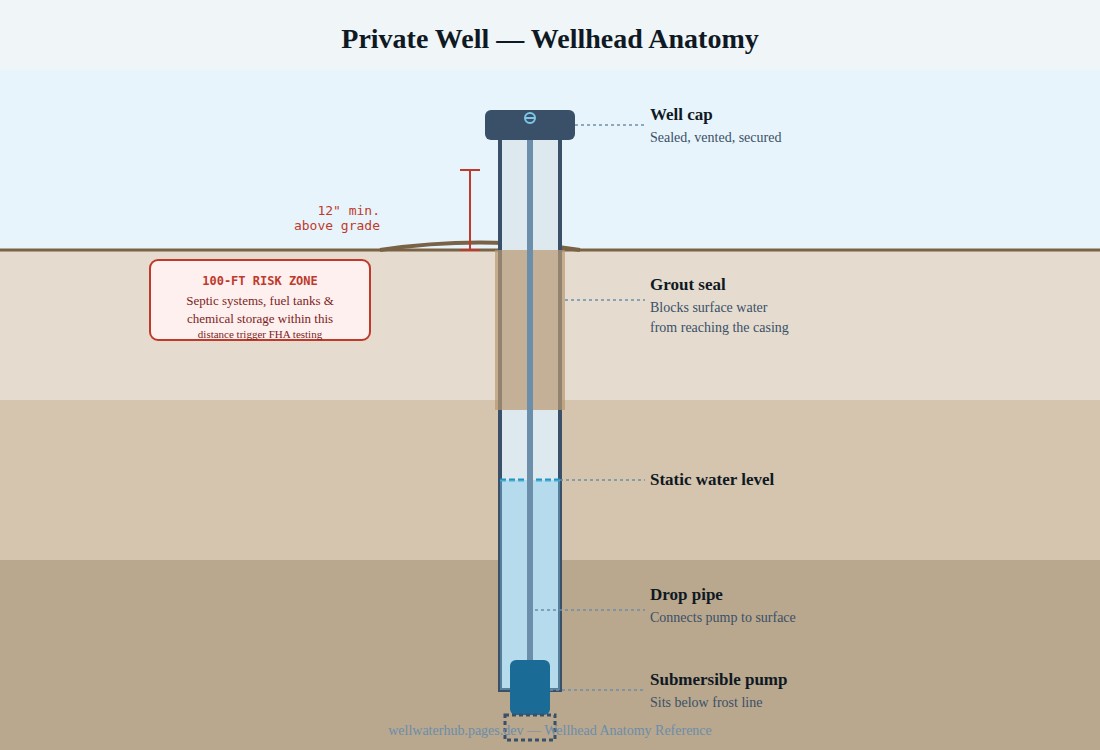
2. Inspect the Wellhead and Cap
Walk to your wellhead and inspect:
- Well cap: Should be secured with screws and show no cracks, gaps, or separation from the casing. A loose or cracked cap allows insects, rodents, and surface water into the casing.
- Vent screen: The small vent on the cap should have an intact, undamaged screen to allow pressure equalization without allowing contaminants in.
- Casing: Should extend at least 12 inches above the ground surface. Look for corrosion, cracks, or damage at the soil interface.
- Grading: The ground around the wellhead should slope away from the casing, not toward it. Pooling water at the wellhead is a contamination risk.
3. Check for Surface Water Ponding
After significant rain, check whether water is pooling within 10 feet of the wellhead. This indicates a grading problem that needs correction before the next wet season. Surface water should drain away from the well in all directions.
4. Inspect Electrical Connections at the Pressure Switch
The pressure switch near your pressure tank should have dry, corrosion-free wire connections. Signs of arcing (blackening around contacts), water staining, or corroded terminals indicate an issue that needs attention from a licensed electrician or pump contractor. Do not touch electrical components if you are not comfortable with electrical work.
5. Test the Pressure Tank
A properly functioning pressure tank delivers water at consistent pressure and cycles the pump at normal intervals. Signs of pressure tank problems:
- Short cycling: Pump turns on and off every few seconds when a tap is open. This indicates a waterlogged pressure tank (the air bladder has failed). Left unaddressed, short cycling wears out the pump rapidly.
- Pressure fluctuation: Water pressure varies significantly between pump cycles. Normal variation is 20 psi (e.g., 40–60 psi). Larger swings indicate an undersized or failing tank.
- Rust or corrosion on the tank: External rust on a steel tank indicates moisture problems. Verify the tank is not sitting in standing water.
Check the pre-charge air pressure at the Schrader valve on top of the tank with the pump off and all pressure bled from the system. Air charge should be 2 psi below the pump cut-in pressure (e.g., 38 psi if your cut-in is 40 psi). A tank that holds no air charge needs replacement.
6. Check All Accessible Pipe Connections
Inspect visible pipe connections at the pressure tank, pressure switch, and any above-grade plumbing for drips, mineral staining (white crust from hard water), or corrosion. Tighten any loose fittings and reseal any minor drips with plumber's tape or thread sealant.
7. Note Current Pump Run Time
If your system has a pump hour meter or run-cycle counter (some newer systems do), note the reading. Tracking pump run hours helps you anticipate pump service intervals. Most submersible pumps are designed for 50,000–100,000+ hours of operation, but run hours vary dramatically by water demand and system design.
8. Test Water Pressure at Multiple Taps
Low pressure at the kitchen sink when a shower is also running can indicate a pump performance decline, a clogged sediment filter, or a failing pressure tank. Note your baseline operating pressure and compare year to year. A significant drop (more than 5–10 psi) warrants investigation.
9. Check and Service In-Line Filters
Sediment pre-filters should be replaced at least annually (more often if you have high iron or sediment). A clogged sediment filter restricts flow and can damage downstream equipment (water softeners, UV systems, RO membranes). Check your filter cartridge—if it’s visibly loaded with sediment, replace it.
10. Verify Treatment System Operation
If your well has treatment equipment (water softener, UV system, acid neutralizer, iron filter, RO), verify each is operating as designed:
- UV system: Check lamp intensity indicator or annual lamp age. UV lamps lose effectiveness over time—replace annually regardless of appearance.
- Water softener: Check salt level and regeneration cycle. Confirm the brine tank has no salt bridges (crust formation at the top with empty space below).
- Acid neutralizer: Check calcite media level; refill as needed (typically annually).
- Iron filter: Verify backwash cycle is occurring on schedule.
11. Keep a 50-Foot Radius Clear
Annually verify that no new contamination sources have appeared within 50–100 feet of your wellhead:
- Fuel storage tanks, oil drums
- Fertilizer or pesticide storage
- New structures that might discharge runoff toward the well
- Animal enclosures or manure storage
If any of these are new since last year, add contaminant-specific testing to your next water test panel.
12. Record Everything
Keep a well log: date of annual test, results, any repairs made, filter replacements, pressure tank readings, and pump service dates. This record is invaluable for diagnosing future problems, required for some insurance claims, and increases the property’s value at resale by demonstrating responsible ownership.
When to Call a Professional
| Symptom | Likely Cause | Action |
|---|---|---|
| Pump runs continuously, no pressure | Pump failure, broken pipe, or low water table | Call pump contractor immediately |
| Short cycling (pump runs every few seconds) | Waterlogged pressure tank | Call pump contractor; pressure tank replacement |
| Sudden low pressure | Clogged filter, pump wear, or drop pipe issue | Check filter first; call contractor if filter is clean |
| Brown or orange water | Rust from casing or pipes; elevated iron | Test water; inspect casing; call contractor |
| Sudden smell (sulfur, chlorine, chemical) | Various contamination sources | Stop drinking water; test immediately; call health dept |
| Crackling sound at pressure switch | Electrical arcing | Call electrician or pump contractor |
| Pump doesn’t turn on | Electrical issue, failed pump, or tripped breaker | Check breaker first; call contractor if breaker is fine |